


Wedge Inserts are also known as Relieving Angle Inserts, Shelf Angle Inserts, Malleable Iron Inserts and Lintel Inserts. The photos and drawings in this article will provide an idea of what they are. To see additional photos and catalog listings click here
Here are some notes on the installation of Wedge Inserts. Bear in mind these are just general notes. We are not qualifies to provide actual instructions. The project manager and erector should be knowledgeable regarding the requirements for their project.
To see drawing of the stages of Wedge Insert Installation click here.
2 Foot Spacing
The plans for your job can show the Wedge Inserts at whatever locations the architect or engineer chooses, but many of the plans we see call for them at 2' intervals. So for a building with a footprint 200' x 200' the perimeter will be 800', hence a typical job will use 400 Wedge Inserts per floor. It is not uncommon for a building to require 2,000 or more Wedge Inserts for the project.
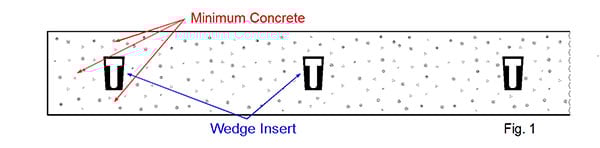
Minimum Concrete x Each Direction
To provide the required strength, the Wedge Insert requires a minimum of concrete below, above and to the side. See Fig. 1. Be sure this is indicated on your drawings.
 Rebar
Rebar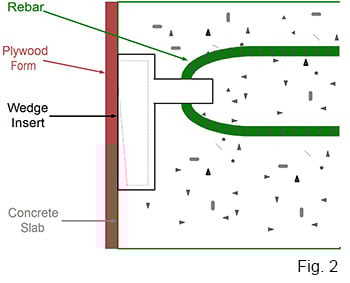
Both the Regular Wedge Insert and the Long Wedge Insert have a steel loop around the back. This is to insert rebar. This rebar is important in making sure the Wedge Insert will hold solidly in the concrete. The plans should show the rebar requirements and layout. See Fig. 2.
Taped Face and Nail Holes
During the Concrete pour liquid concrete will invade every space and move in any direction it can. It is important not to allow any concrete to seep into the Wedge Insert. Once hardened, it will block the movement of the Askew Head Bolt. This is why the Wedge Insert has heavy tape over the face. The tape alone will not stop the concrete if the Wedge Insert is not fastened tightly to the plywood form. Remember during the pour, the rebar will be shifting and can exert pressure to pull the Wedge Insert away from the form. Also, the mounting holes in back of the Wedge Insert will admit concrete to seep in if they are not covered completely. See Fig. 3.

Fastener Selection
Once the concrete has cured the forms Plywood forms will be removed. The nail or screw used to fasten the Wedge Insert to the form will still be there, and the part that was in the plywood will be sticking out. This needs to be removed. Determine in advance how you will remove them and select a fastener with that in mind.
 In Fig. 4 to the left the fastener ends have been removed. This could be done with a cut-off wheel. In that case care should be used not to remove the galvanized coating. This method will leave the remaining barrel of the fastener in the Wedge Insert cavity where the Askew Head Bolt travels. The erector should determine in advance if this will be a problem.
Another way to remove the fastener body is with a firm stike with a chisel near the back of the cavity. For this method the erector would want to select a very brittle fastener that will snap easily.
It is important the erector understands how the fasteners will be removed, and test that method prior to actual installation.
For drawings showing the steps in the installation of Wedge Inserts, Shelf Angle Inserts, Relieving Angle Inserts and Malleable Iron Inserts, click here.
